
- Open the iPhone Shortcuts app and add “Video to GIF” to your shortcuts. Tap Video to GIF, pick a video from your library, and tap “Save” to convert it to a GIF.
- Open the videos folder in the Android Gallery app, tap “Play Video”, and tap “GIF” on the upper right. Use the sliders to adjust the GIF length, then tap “Save”.
- Use the Giphy GIF Maker tool to record GIFs with your phone or convert videos to GIFs. Use the “Slideshow” tool to make a GIF slideshow from many images.
Creating GIFs on an iPhone & iPad using Apple Keynote
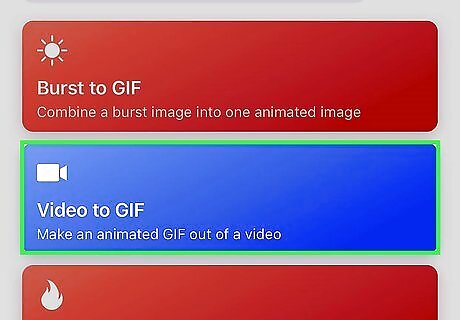
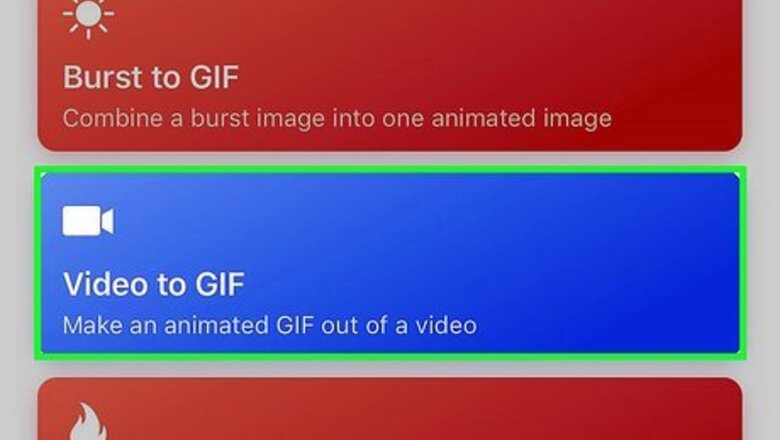
Convert videos into GIFs using the Shortcuts app. Tap the “Gallery” tab at the bottom right in the Shortcuts app and search for “Video to GIF”. Tap the “Video to GIF” icon, select “Add Shortcut”, then return to the Shortcuts menu and select “Video to GIF”. Choose a video from the list, then tap “Save” on the upper right to convert it to a GIF. If your video is too long, you’ll be prompted to trim it down. Drag the sliders above the video from left to right to select which frames will appear in the GIF, then select “Save”.
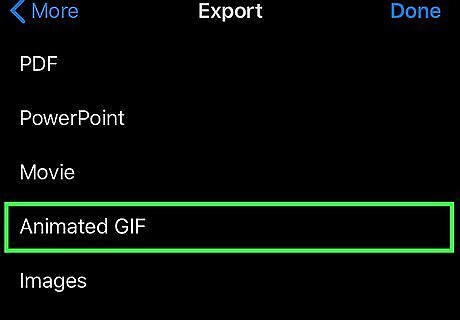
Make a GIF slideshow from slides in the Keynote app. Use the Keynote app to create a slideshow presentation, making each image its own slide. Tap the circle with three dots on the upper-right, tap “Export”, then tap “Animated GIF”. Choose a resolution, slide range, frame rate, and auto-advance setting, then tap “Export”. Select “Share” and choose “Save” to save the GIF to your Photos. The “resolution” sets the size and quality of your image. Choose Small, Medium, Lage, or XL. The “slide range” refers to the slides included in your GIF. Use the number wheel to set the beginning and ending slides, then tap “Back”. The frame rate indicates how fast the slideshow will play. For example, a framerate of 1 frame per 5 seconds will make the slideshow progress to the next image every 5 seconds. Select your desired framerate, then tap “Back”. The “Auto-advance” lets you decide how much a user can skip ahead in the slideshow by tapping the image. Choose a lower setting to cause a tap to advance the slideshow by just a few frames, or a higher setting to make the slideshow advance by many frames.
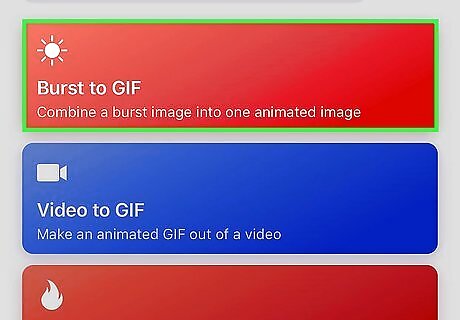
Convert burst photos into GIFs with the Shortcuts app. Select “Gallery” at the bottom right in the Shortcuts app and search for “Burst to GIF”. Tap the “Burst to GIF” icon and select “Add Shortcut”, then go back to the Shortcuts menu and select “Burst to GIF”. Choose a burst from the list, then tap “Save” on the upper right to convert it to a GIF. A “Burst” is a sequence of photos taken rapidly, back to back. If you don’t have burst photos in your image library, you can take some and convert them to GIFs. To take a Burst photo, open your camera app, point your camera at an object, then drag and hold the round shutter button to the left to take a burst of photos. Your iPhone will take 10 photos per second until you let go of the button. Your sequence of photos will be automatically saved as one “Burst” file. For example, if you drag and hold the shutter button to the left for 3 seconds, your iPhone will take a burst of 30 photos.
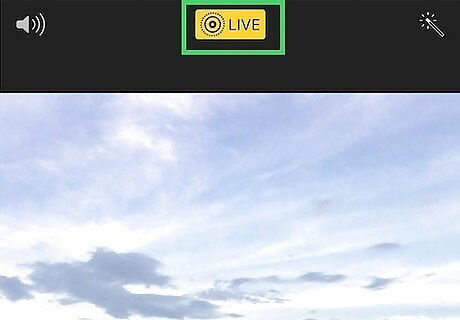
Use the Photos app to convert Live Photos into GIFs. Open the Photos app, select “Albums” at the bottom, and select “Live Photos” from the list. Choose a live photo, then tap “Live” on the upper left to access the dropdown menu. Select “Loop” to convert the live image to an animated GIF. Use this method if you already have Live Photos saved in your image library. If you don’t have any saved, you can take some and convert them to GIFs. To take a Live Photo, select the round “bullseye” icon on the upper-right of your screen when using the camera app. Then press and hold the round button at the bottom of your screen to record a Live Photo. For instance, press and hold the button for 3 seconds to create a 3-second Live Photo.
Making GIFs on Android, Pixel, and Samsung Devices
Convert videos into GIFs using the Gallery App. Open the Videos folder in your Gallery app and select the video you want to convert. Select “Play Video”, then tap “GIF” in the upper-right corner. Use the sliders at the bottom of your screen to adjust the GIF’s length and playback speed, then tape “Save”. The GIF will be automatically saved in the Gallery app. This method will work on all Android devices, including Pixel and Samsung phones.

Use Google Photos to create a GIF slideshow. Open Google Photos and tap “Library” from the bottom menu, then tap “Utilities”. Select “Animation” under the “Create New” section, then select images from your gallery to include in the GIF. Select “Create” to combine the images into a GIF slideshow. Your GIFs are labeled as “Animations” in your Google Photos app. This method works for Android, Pixel, and Samsung phones.
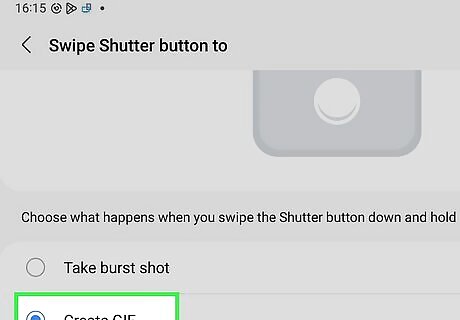
Record GIFs instantly with your Samsung Galaxy’s Camera. Open the Camera app on your Samsung Galaxy phone and tap the gear on the upper-left to access the Camera Settings menu. Tap “Swipe Shutter button to”, then select “Create GIF” from the popup menu. Open the Camera app, swipe down and hold the shutter button to record a GIF, and release the button when you’re finished. Your recording will look like a video, but it’ll be saved as a GIF file. Note that GIFs don’t have sound. This method only works on Samsung Galaxy phones.
Using the Giphy Website or Mobile App
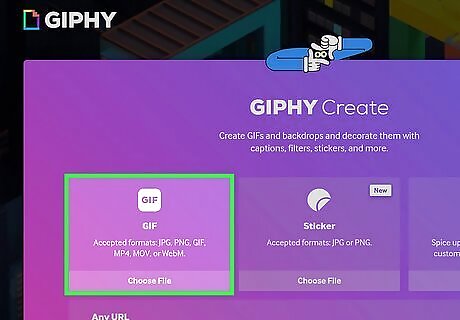
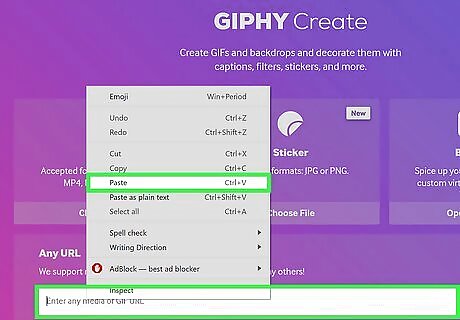
Use the Giphy GIF Maker on a desktop to convert videos to GIFs. Go to Giphy’s GIF Maker page and click “Choose File” to upload a video from your desktop. You’ll be redirected to an editing screen. Use the sliders to choose a Start Time and Duration for your GIF, then click “Create GIF”. You’ll be redirected to a page with your new GIF. Right-click the GIF to save it to your desktop, or click the social media icons on the screen to share your GIF right away. Your video file must be under 100 MB and less than 15 seconds long. If the file is too large or too long, use a program like Windows Video Editor or iMovie to create a shorter clip or reduce the file size. After choosing the Start Time and Duration, you can also decorate your GIF with stickers, filters, and captions. You can even add tags or a source URL to credit the video’s creator. You can also create a GIF from an online video by pasting the video URL in the bottom search bar and hitting “Enter”. Then follow the steps above to convert it to a GIF. You need to have a Giphy account to use the website. Create an account if you haven’t done so already.
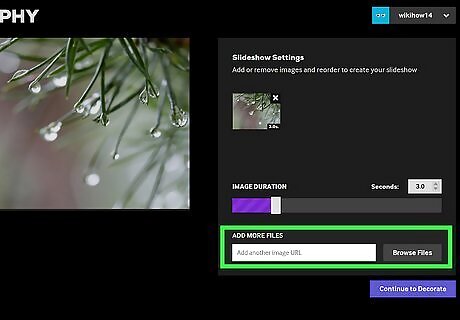
Use Giphy Slideshow on a desktop to make a GIF from images. Drag and drop images from your desktop into the square labeled “GIF” on the left side of Giphy’s GIF Maker page. Arrange them in the order you want, then use the sliders to change the length and time the still images will appear on your screen. Click “Continue to Decorate” to add effects, then click “Continue to Upload.” Finally, click “Upload to GIPHY” to be redirected to a page showing your finished GIF. Right-click your GIF to download it, or share it using the social media buttons on your screen. In the “Continue to Decorate” menu, you can add captions, stickers, filters, and other effects. You can also add image tags and a source URL in the “Continue to Upload” menu. A source URL is the URL where you originally found the images for your slideshow (for example, if your slideshow includes images from a national park’s website, you can provide the URL of the park’s website).

Use the Giphy app to create GIFs on mobile devices. Download and open the Giphy app and select the “+” sign on the upper right. Select “GIF” from the bottom menu, then tap and hold the round button to record a video, or tap the square at the bottom-left to pick a video from your library. Tap the scissor icon and use the sliders to adjust the clip’s length. Tap the arrow at the bottom-right and select “Share GIF,” then select “Save GIF”. After adjusting the clip’s length, you can select the square button on the upper right to crop and zoom in on the GIF. Select the pink “Aa” icon at the bottom left to add text, or choose the purple and green icons to add filters, stickers, and other effects. You don’t need a Giphy account to use the mobile app.
Converting Videos to GIFs with Adobe Photoshop
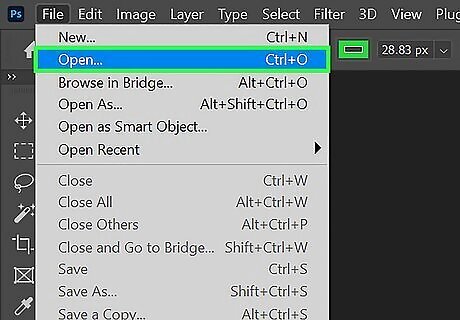
Go to “File” → “Open” and choose a video to import. Choose a video that only includes the content you want to appear in the GIF. Use editing software like iMovie or Windows Video Editor to create a clip with the content you want, then import that clip into Photoshop. If you don’t own Photoshop, you can purchase an annual subscription for $20.99/month, or pay $31.49/month and cancel anytime. You can also purchase a 1-year subscription for $239.88, prepaid.
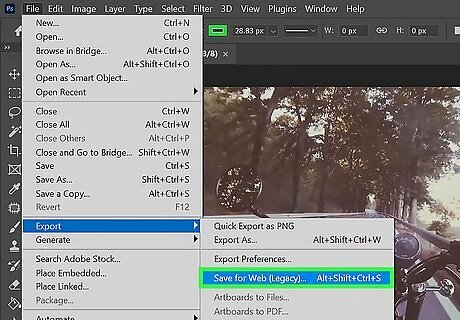
Go to “File” → “Export” and select “Save for Web”. A popup screen will appear. Click the second dropdown menu beneath “Preset” on the upper right. Select “GIF” from the list of options, then click the top dropdown next to “Preset” and choose “GIF 64 Dithered”. Click “Save”, choose a filename and destination for the file, then click “Save” at the bottom right.
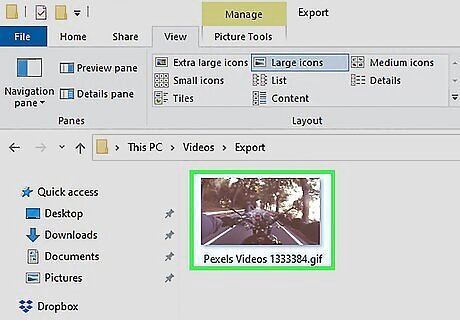
Open the file on your desktop to view your GIF. The GIF will show the original clip looping continuously. Upload your GIF to social media if you like, or share it directly with friends. You can also use apps and websites like Giphy to add filters and captions to your GIF.
Convert YouTube Videos into GIFs on Giphy.com
Paste the video’s URL into the white bar on Giphy’s GIF Maker page. You’ll be redirected to the editing page. You’ll use the tools on this screen to adjust your GIF in the next steps. You need a Giphy account to use the Giphy website. Create an account if you haven’t done so already.
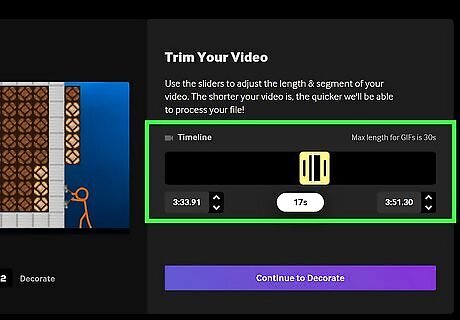
Use the sliders on the right to adjust your GIF’s length. Use the left slider to choose the start time for your GIF. Then use the right slider to adjust the finish time. Your GIF can be up to 30 seconds long. Click “Continue” to Decorate” when you’re finished. The sliders will appear red if your GIF is over 30 seconds long. Once the length is 30 seconds or less, the slider will turn yellow and you’ll be able to select “Continue to Decorate”.
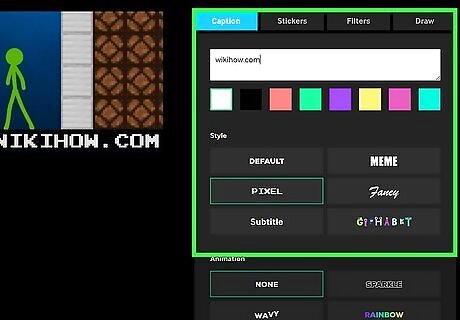
Add captions, filters, and other effects on the decoration page. Add optional captions with different fonts, colors, and text sizes. Use the filters to change the colors and shading. If you want, use the “Stickers” option to add extra animations on top of your GIF, or the “Draw” option to add your own doodles and designs. Click “Continue to Upload” when you’re finished. Use the “Search” menu under “Stickers” to find specific animations. For instance, you could search for winter-themed animations if you’re making a holiday GIF.

Add an optional source URL and tags, then hit “Upload to Giphy.” Under “Public”, select “ON” to allow other users to see your GIF, or choose “OFF” to make your image private. Private images won’t come up in search results, but you can still share the URL with friends. When finished, hit “Upload to Giphy” to be redirected to a page where you can view your GIF. Include a source URL if you want to give credit to the person who uploaded the video. Add tags to help other Giphy users find your GIF more easily. For instance, you could add the tag “Halloween” to make your image come up when users search “Halloween”.
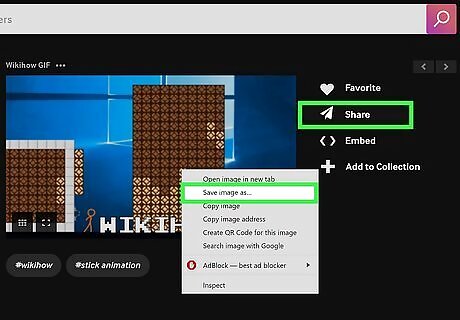
Save your GIF to your device or share it on social media. To view your saved GIFs online, log into your Giphy account and select your username on the upper right. Select “collections” to view all your saved GIFs. You can share your GIF with its unique URL, save it to your device and send it to your contacts directly.


Comments
0 comment