views
Two-Channel Amps
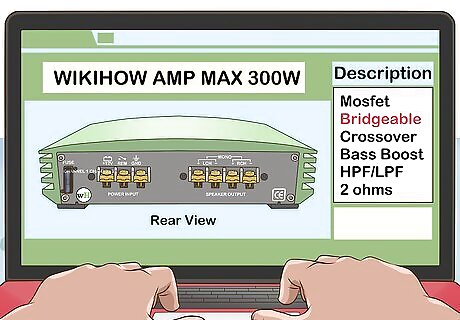
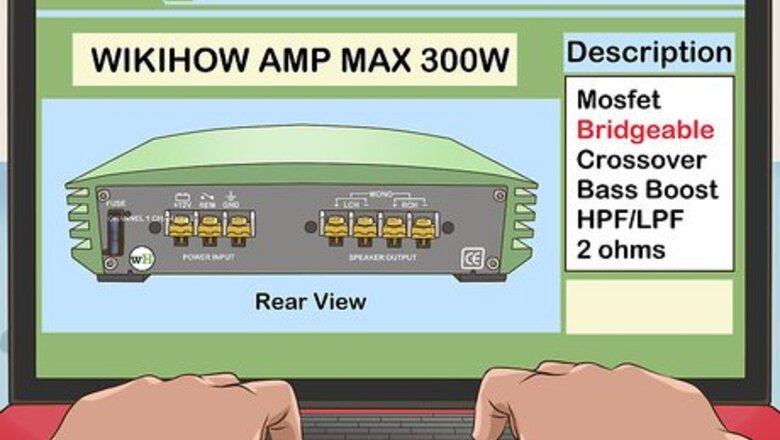
Make sure your amplifier can be bridged. This should be indicated on the documentation pamphlets that came with the amplifier, or the amplifier itself. If the amplifier is used, or lacks documentation, go online and check for the specifications on the manufacturer's website. Bridging an amplifier cuts the resistance load (measured in ohms) in half, which can cause it to overheat. Be sure to check your manual (or the manufacturer’s website) to see if once connected to a speaker, whether or not your amplifier can function at half the ohms it currently uses. Most amplifiers have a small diagram near the channels indicating the terminals you would use to bridge it. If your amplifier does not claim to be able to bridge, don't try to bridge it. It may already be bridged internally, and you could cause damage to your amplifier. Be aware of the fact that if your amplifier is a stereo amplifier (amplifying both left and right), bridging it would cause it to become a mono amplifier (amplifying from one; either the left or right).
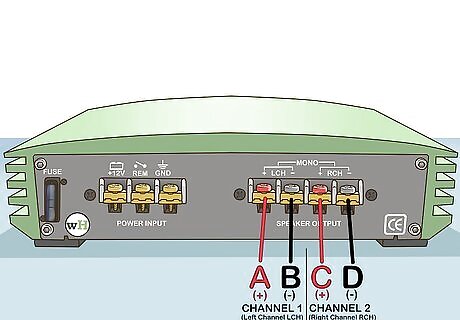
Know the layout of your equipment. On your two-channel amp, you should see 4 terminals: a positive (+) and a negative (-) for channel 1, and a positive (+) and a negative (-) for channel 2. Each terminal will be labeled as follows: Channel 1 "A" (positive) "B" (negative) Channel 2 "C" (positive) "D" (negative)
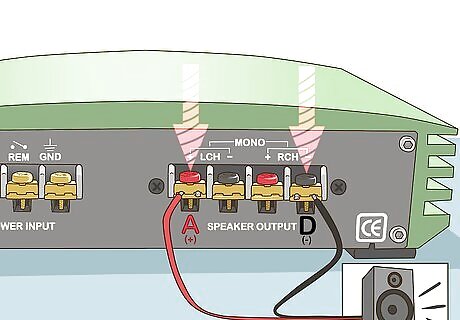
Connect the amplifier to one speaker. From the wires coming out of the speaker, connect the positive speaker lead to terminal A (the positive for channel 1) and connect the negative speaker lead to terminal D (the negative for channel 2). Connect these wires by unscrewing the screw in that terminal, placing the wire in between the top and bottom portions of the terminal, and then screw the screw down tightly to secure the wire. The wires coming from the speaker are going to be insulated with a plastic coating. You will need to strip off a small portion of the wire insulation (less than 1 inch) using a pair of wire strippers in order to secure it to the terminals. What this connection does is it combines the power from the two separate channels, doubling your power output.
Four-Channel Amps
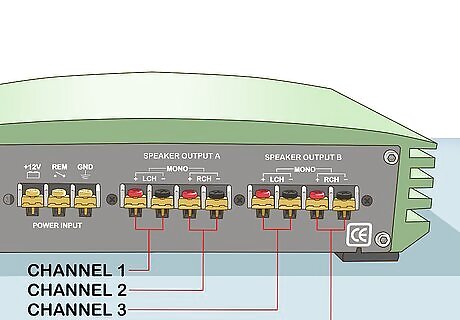
Know your amplifier. Just like method 1, you must figure out if your four-channel amplifier can be bridged. Taking all the same precautions, be sure to consult the amplifier manual or research your amp model online to be sure it can be bridged.
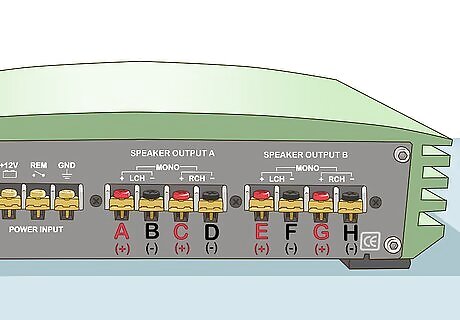
Know the layout of your equipment. On your four-channel amp, you should see 8 terminals: channels 1 through 4 each have a positive (+) and negative (-) terminal. Each terminal will be labeled as follows: Channel 1 "A" (positive) "B" (negative) Channel 2 "C" (positive) "D" (negative) Channel 3 "E" (positive) "F" (negative) Channel 4 "G" (positive) "H" (negative)
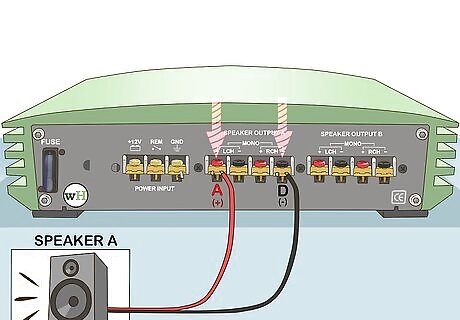
Connect the amp to the first speaker. From the wires coming out of the speaker, connect the positive speaker lead to terminal A (the positive for channel 1) and connect the negative speaker lead to terminal D (the negative for channel 2). Again, just like bridging a two-channel amplifier, connect these speaker wires to the amplifier by unscrewing the screw in that whichever terminal you are connecting the wire to, place the wire in between the top and bottom portions of the terminal, and then screw the screw down tightly to secure the wire. Once the wires are secured, the first speaker is connected to the amplifier.
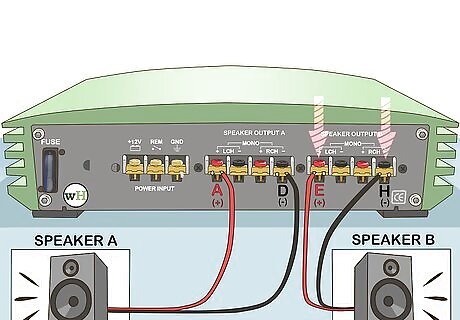
Connect the amp to the second speaker. Following the previous method, again take the wires coming from the second speaker, but this time, connect the positive speaker lead to terminal E (the positive for channel 3) and connect the negative speaker lead to terminal H (the negative for channel 4).


Comments
0 comment