
- Unplug your fan and wipe the inside and outside of the circular ring with a damp cloth.
- Then, put a tube or brush attachment on your vacuum and vacuum the vent holes on the base of the fan.
- Clean inside the fan by twisting the circular top counterclockwise. Then, use a damp cloth to wipe inside the top and base of the fan.
Cleaning the Outside of the Fan
Unplug the fan from the outlet. This prevents any risk of injury and allows you to clean the fan thoroughly.
Wipe the inside of the fan with a damp and dry cloth. Run a clean cloth under water and squeeze out the moisture so it’s damp. Just wipe the inner ring of the fan in long, swift motions. Then, use a clean, dry cloth to dry off the moisture. Dyson fans do not have blades, which makes the cleaning process a lot easier.
Clean the outside of the fan with a damp and dry cloth. Moisten another clean cloth with water, squeeze out the excess water, and wipe the outside of the ring. Then, wipe away the moisture with another clean, dry cloth. As an alternative, use paper towels or baby wipes.
Vacuum the air intake vents on the fan base using a tube attachment. Look for the circular holes that wrap around the base of the fan. These are the air intake vents, which capture a lot of dust and dirt. Just put the thin tube or brush attachment onto your vacuum. Then, run the attachment over the air intake vents. The air intake vents are typically located towards the bottom of the fan base.
Brush off any remaining dust with a dry cloth. Examine the surface of the fan and the air intake vents for any lingering dust or dirt. Then, use a dry cloth or paper towel to wipe away debris with long, quick movements. Keep dusting until you no longer see dirt and debris on your fan.
Cleaning the Inside of the Fan
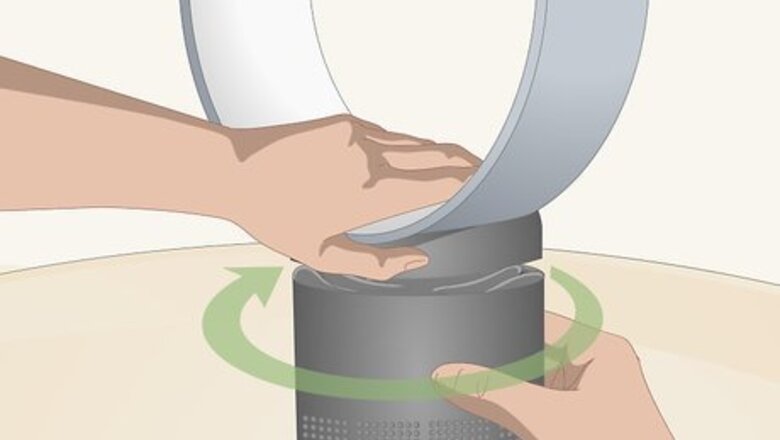
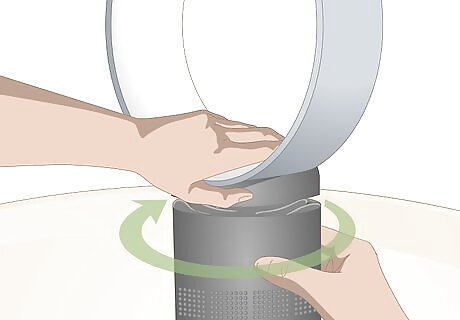
Twist the top of the fan counterclockwise to separate it from the base. Use one hand to hold the base of the fan in place while you use your other to remove the circular fan top. This exposes the inside of the fan. If you have trouble removing the top of the fan, consult your fan’s user manual for instructions on how to disassemble it. There is a visible line separating the circular fan from the base.
Clean the inside of the top of the fan with a moist cloth. Hold the circular part of the fan upside down to look inside for dust. Then, gently wipe up any debris with a damp cloth. Feel free to use a feather duster or baby wipe instead of a cloth.
Wipe the inside of the base with a damp cloth. Use gentle pressure to wipe away any dust and dirt that’s resting on the inner, mechanical portion of the base of the fan. Use a feather duster or can of compressed air instead of a damp cloth, if you prefer.
Unscrew the ring around the base and the mechanical piece. Use a T8 screwdriver to remove the screw on the ring around the base and pry off the part. This exposes the motor assembly. Then, use the same screwdriver bit to unscrew the 4 screws on the motor assembly and open it up. Take a picture of how the pieces are assembled to make reassembling it easier.
Wipe a damp cloth over the motor assembly pieces and reassemble it. Moisten a clean cloth with water and gently glide it over the motor assembly casing and the rotating impeller. For a deeper clean, push the cloth through the blades of the impeller. Then, use a clean cloth to dry both pieces. Simply put the impeller back inside the base of the fan, put the casing on top, and screw the 4 screws back into the base.
Lift out the motor assembly to vacuum the bottom of the base. The motor assembly is connected to the base of the fan with wires, so carefully lift it out of the base. This reveals the very bottom of the base of the fan. Put the tube or brush attachment on your vacuum to clean the sponge at the bottom of the base. Then, run the vacuum over the air intake vent holes. Alternatively, blow compressed air through the air intake vents from the inside of the base.
Reassemble the fan. Insert the motor assembly back inside the base of the fan. Then, screw the ring piece back on top of the assembly. Simply twist the top of the fan onto the base using a clockwise motion, and you’re done! If you are uncertain how to reassemble your fan, check your fan’s user’s manual.


Comments
0 comment