
Measuring and Cutting the Poles
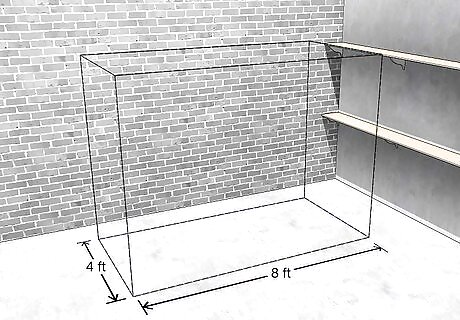
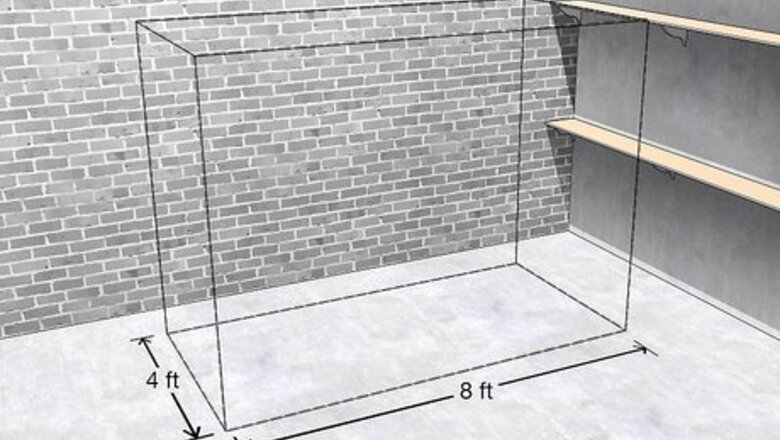
Measure to figure out the dimensions of your paint booth. Your project needs and the size of your garage will determine how big your booth needs to be. An 8-foot (2.43m) wide paint booth is suitable for garage or a large patio, for instance, and it will typically fit a full car inside it. However, an 8 by 4 feet (2.4 by 1.2 m) will be big enough for most other projects, which will be the example used below. A single-car garage is typically 9 to 10 feet (2.7 to 3.0 m) across, as an example, though they can be as big as 12 or 14 feet (3.7 or 4.3 m) across.
Sketch out a frame to determine how much pipe you'll need. The frame will need vertical pipe in each corner, as well as vertical supports in the back wall and both side walls. It will also need horizontal pieces all around the top, as well as around the middle in the back and on the sides. For instance, for the example project, you'll need 9 10 feet (3.0 m) sections of PVC pipe with a diameter of 1.25 inches (3.2 cm). This diameter is sturdy enough for most projects. PVC pipe is typically sold in sections that are 10 feet (3.0 m) long.
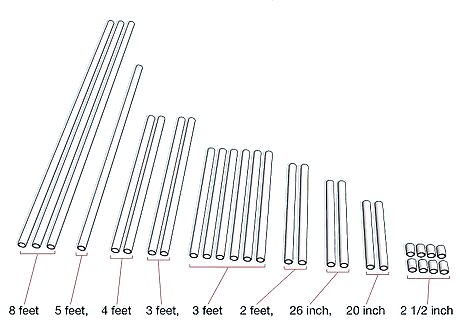
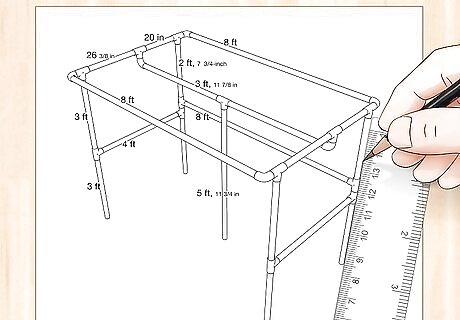
Determine the lengths of pipe you need to make your booth. Divide the sides into 2 sections at the top for the extra support. Also, divide the middle pole across the top of the booth into 2 sections for the extra vertical support in the middle. Decide what you want the height of your booth to be, taking into account the height of your garage. Keep in mind, the poles for height will be divided into 2 sections as well. Mark on your sketch how long you want each section to be. The most important thing is that all the parallel pipes are equal across the booth. For the example design, the sections you need are as follows: 3 8-foot (2.43 m) sections 1 5-foot, 11 /4-inch (1.82 m) section 2 4-foot (1.22 m) sections 2 3-foot, 11 /8-inch (1.22) sections 6 3-foot (0.91 m) sections 2 2-foot, 7 /4-inch (0.806 m) sections 2 26 /8-inch (0.67 m) sections 2 20-inch (0.51 m) sections 8 2 /2-inch (6.35 cm) sections
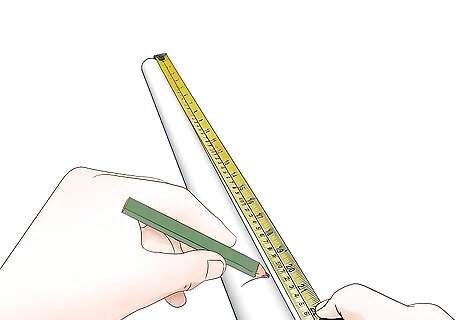
Mark the points on the pipe where you'll need to cut. Gather your pipe up and measure out each piece you'll need. Use a permanent marker to designate where to cut on each piece. Lay out your pipe to make sure it looks right before you cut it.
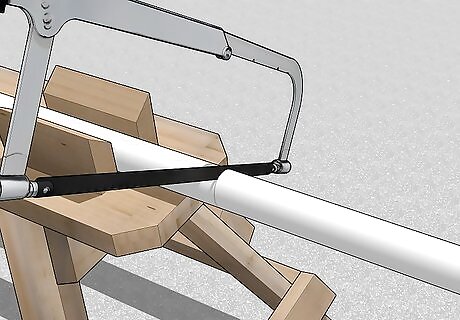
Cut the pieces to length according to the marks you made. Secure the pipe in a small workbench with 2 planks on each side acting as a vise or with a table-mounted vise. Use a PVC saw or clamp-style pipe cutter to saw through the pipe by slicing right through the marks you made on the pipe. Slide the saw back and forth while applying light pressure downward to cut through it. To clean up the ends of the pipe, rub them down with a sanding block. A simple hacksaw can also cut through PVC pipe.
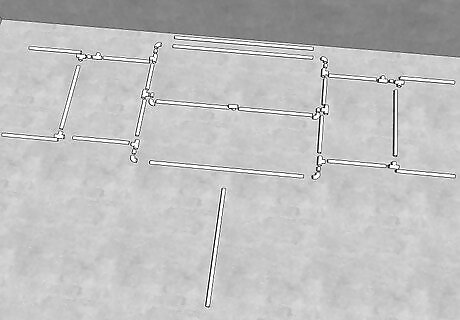
Lay out the pipes how they will go together. Place elbows at the corners and T connectors where 3 pipes meet. You'll also need small sections to attach the T connectors to the elbows at the corners. Check the 3-foot (0.91 m) pipes and choose the ones that have most even ends. These will form the 4 posts at the corners that touch the floor. Lay out 2 more in the front on each side to form the top of these posts, then the 2 2-foot, 7 /4-inch (0.806 m) sections in the back for the top of these posts. The 3 8-foot (2.43 m) sections go along the top horizontally in front and back and along the middle of the wall in back, while the 5-foot, 11 /4-inch (1.82 m) section goes vertically in the middle On the sides, the 4-foot (1.22 m) sections form the middle horizontal poles, while the 26 /8-inch (0.67 m) will make the front half the horizontal section at the top and the 2 20-inch (0.51 m) will make the back part of this section.
Connecting the Pipes
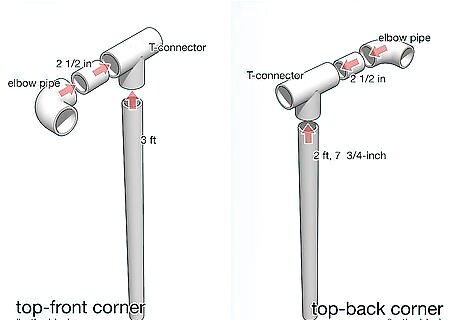
Attach a T connector and elbow connector to the top of each corner pole. Start with the front corner. Place a T-connector on top of a 3-foot (0.91 m), then use a small piece of pipe (the 2 /2-inch [6.35 cm] sections) in the joint extending toward the front. Attach an elbow connector with this small piece of pipe. That will be the support for the front pole along the top. Do the same for the smaller 2-foot, 7/4-inch (0.806 m) sections that will form the top of the poles in the back, except the elbow connector will extend along the back. Ask for help with assembly if possible!
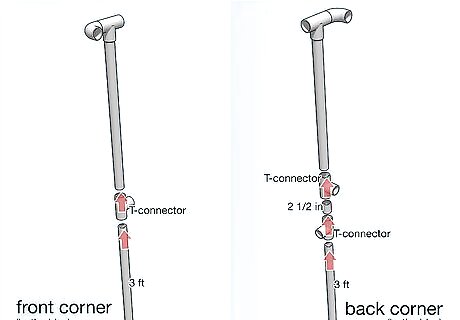
Build the rest of the corner posts with T connectors. On the front, connect the top to the 3-foot (0.91 m) bottom with 1 T connector with the opening facing toward the back of the booth. In the back, use a small piece of pipe to connect 2 T connectors in the middle of the post. Face one toward the front and one pointing along the back side.
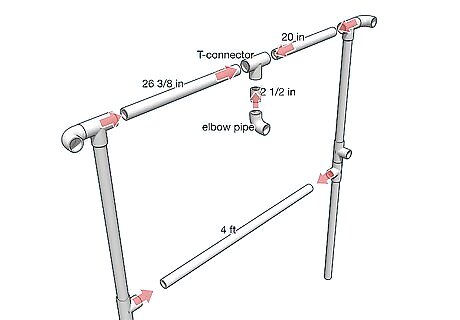
Build the sides using the corner posts and more connectors. At the top, connect the front corner pole to 1 26 /8-inch (0.67 m) section. Add a T connector, then 1 20-inch (0.51 m) section. Stick the other end of this section into the back corner pole. Place 1 4-foot (1.22 m) section across the middle of the side connect the front pole to the back pole halfway down. Find the T connector in the middle of the side at the top. Use a small piece of pipe to connect an elbow joint to it that's facing toward the middle. Do the same with the other side.
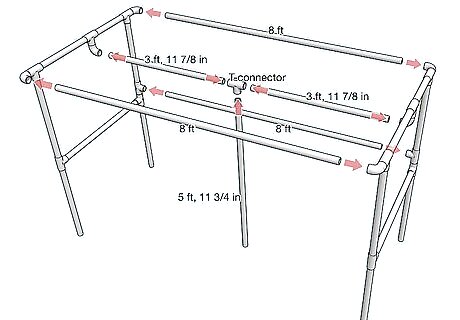
Connect the sides with the longer poles. Build a post for the middle of the booth by sliding 1 5-foot, 11 /4-inch (1.82 m) section into the bottom of a T connector. Add 1 3-foot, 11 /8-inch (1.22) section to either side of the connector. Push the smaller sections into the middle of the walls at either end at the top. Add the 8-foot (2.43 m) sections at the top in the front, the top in the back, and the middle in the back. Don't fully secure these joints until all the poles are in place.
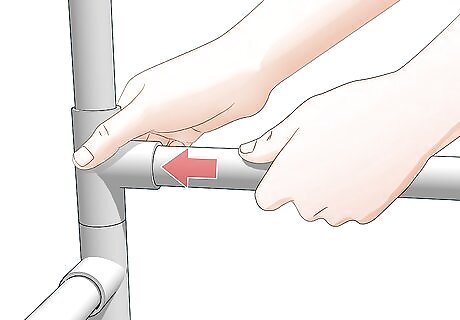
Secure each pipe by fully inserting it into the PVC joint. It is extremely difficult to break PVC pipe or joints with your bare hands, so apply plenty of pressure to ensure a tight fit. Press the pipe in to each joint. You may need to twist the pipe slightly to get everything connected tightly.
Enclosing the Booth
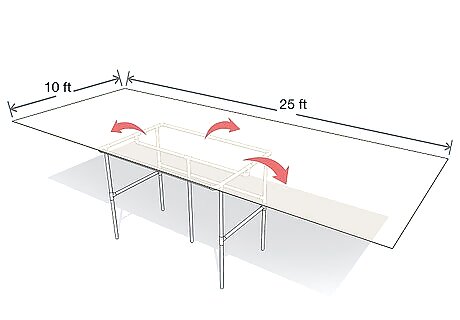
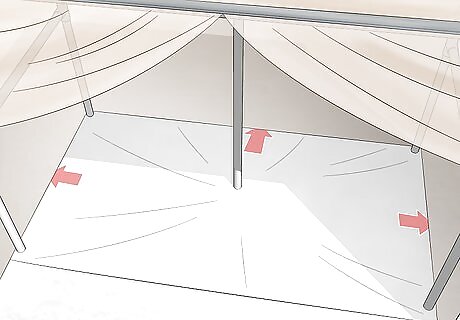
Lay a 10 by 25 ft (3.0 by 7.6 m) piece of plastic sheeting over the whole booth. Place it so the long piece goes up one side, over the top, and down the other side. Draw enough to the back to completely cover it. Leave just enough over the front to pull over the pipes, about 1 foot (0.30 m) or so.
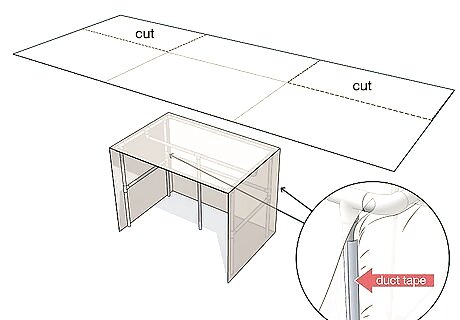
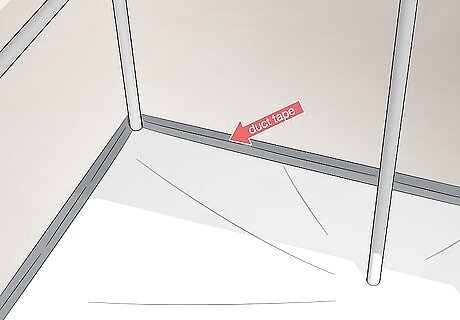
Trim and tape the plastic along the back. Use clamps to hold the plastic in place while you're working on it if you have them. Make sure the bottom of the plastic is even with the bottom of your booth, then cut the plastic along the corner pole straight up from the bottom to the corner at the top. Tape the edge of the plastic around the corner pole with duct tape. If you're having trouble with tape sticking properly, place the tape over the plastic and pole. Then, poke a hole through the plastic and tape on the inner side of the pole. Run a zip tie through the hole around the pole, tape, and plastic. Secure the zip tie to help hold the plastic in place.
Cut and tape down the plastic on the sides in the back. Flatten the piece of plastic on the side and then cut up from the bottom to the corner at the top in a straight line. Tape the edge of the plastic to the pole in back, sealing off the edge by going all along it with tape. Do the same for the other back corner. You should have cut a large square out of the corner of the plastic on each side. Save these for the front.
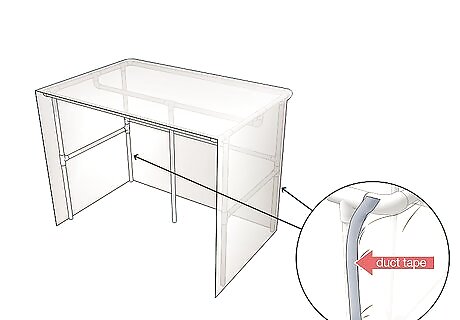
Tape the front of the plastic in place. Pull the overhang in front taut, and tape it against itself and onto the poles in front. Hang the pieces of plastic you cut out of the back in front, taping them along the top and on the front corner poles. This should cover the whole front. Seal off the seams completely with tape. Leave the opening between the 2 sheets in the front, except seal it a little at the top and bottom. When you get in the booth to paint, close this seam tightly with clamps. If the plastic doesn't cover the front, you may need to get another sheet of plastic to cover the front.
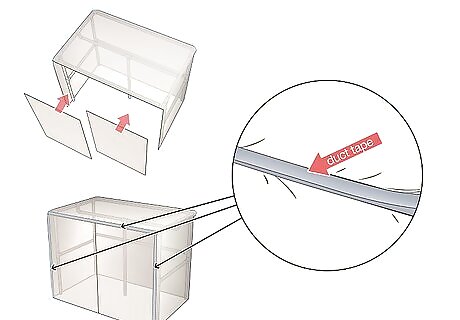
Lay down a 4 by 15 feet (1.2 by 4.6 m) drop cloth inside the booth. Position it so that the corners rest on each leg of the paint booth. Make sure it is flat by pushing out any creases or bubbles. Then lift each of the paint booth's legs up one at a time to push the drop cloth edges under each leg. If the cloth doesn't fit right or it doesn't line-up under the paint booth's legs, step back to inspect the legs. Each leg should be near-perpendicular to the ground. Adjust as needed.
Secure the plastic sheeting on the inside. Tape it to the corners of the booth inside, as well as the drop cloth. Start on one side, attaching the plastic to the drop cloth with the duct tape, using strips to completely seal the seams. This will hold the plastic and drop cloth in place.
Adding Ventilation
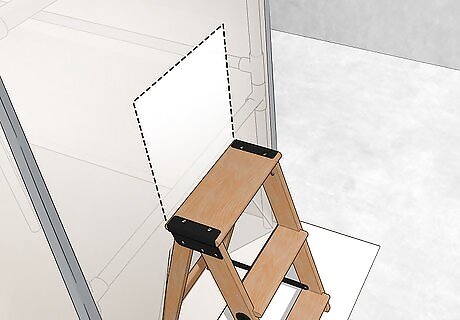
Create a structure for a box fan. Using a small stepladder, cardboard boxes, or other temporary structure, place a box fan high enough to at least clear the middle PVC pipe of your paint booth. Position the structure outside of the booth on one side. If necessary because of limited space, place the structure so that it is approximately 1 inch (2.5 cm) from the middle PVC pipe. This will place the legs of the ladder inside the booth, but they will be covered by plastic.
Cut a hole for the fan. Trim a hole that's almost exactly the size of the fan at the height you've got it. Pull the plastic to the edge of the fan and seal it all around with tape. If you need to, add extra plastic to make sure you get a tight seal.
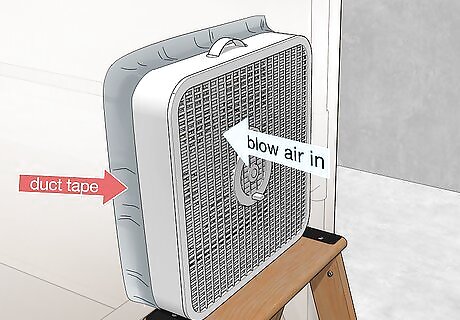
Face the fan toward the inside of the booth. You're creating positive pressure, meaning you'll blow air in and let it out in another filter. If you pulled air from the paint booth through the fan instead, you could end up drawing dangerous fumes into the fan's motor.
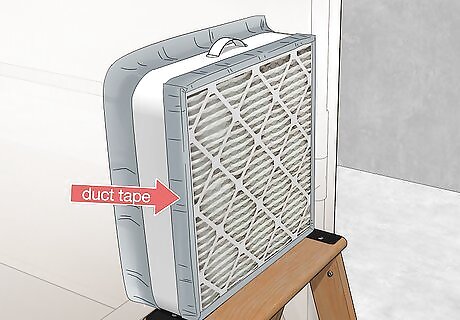
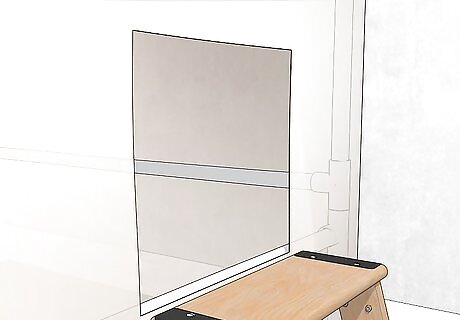
Tape a furnace filter to the back of the fan. You don't want to blow dust into the booth, so find a filter that's the same size as the fan. Seal it to the back of the fan using duct tape. You can also do the opposite if you prefer. That is, you can tape a filter into the side of the booth instead of the back of the fan. Then, just face the fan toward the filter.
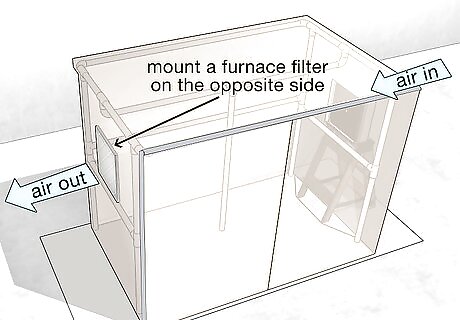
Mount a furnace filter in the plastic with duct tape. Cut a hole in the plastic large enough for a filter on the side opposite the fan. Tape it in place to the plastic, making sure you seal all the edges with tape. When using the paint booth, always run the fan.
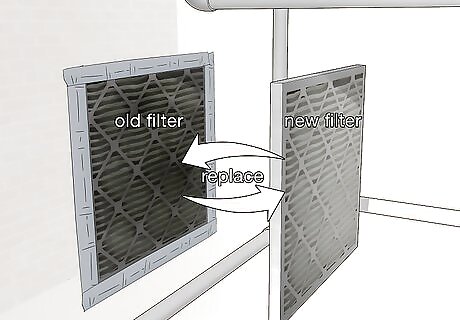
Replace your filters regularly. The furnace filters will eventually fill with overspray and paint dust. Each time the filter is changed, either pull up the existing duct tape holding it in place or cut it out with a blade. If you're using a blade, be careful not to cut the plastic! It may be helpful to add the new filter with a different color duct tape each time so you know which tape to remove or cut without touching the wrong tape.


Comments
0 comment