
First Layer
Familiarize yourself with the Notations at a later step in the article.
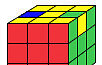
Choose one face to start with. The most common face for beginners to start with is the white face. In the examples that will follow, the color for the first layer is white. It’s important to note that starting with a color other than white can be confusing if you are just starting. This is because you will have to imagine different colors in place of the ones in this article.
Cube_FLm1cross_incorrect_214.png Cube_FLm1cross_correct_585.png Solve the cross. Find the side with the white square in the center and put it on top. Set into position the four edge pieces that contain white. The color that the edges have must line up with both the white center and the center on the sides of the cube. The cross only needs a maximum of eight moves to become solved. (five or six in general). If you put a white edge piece in the correct place but it is flipped around, then try popping it out of the top layer and reinserting it correctly. If you are really struggling, then put the white edge pieces next to the yellow center instead and then rotate each edge piece above its correct center, bringing it down so it is now next to the white center instead. Place the cross at the bottom. Turn the cube over 180° so that the cross is now on the bottom.
Solve the four corners of the first layer, one by one. You should also be able to place the corners without needing algorithms. To get you started, here is an example of one corner being solved: Rubik_example01_step1_246.png VRU_128.png Rubik_example01_step2_768.png HUL_668.png Rubik_example01_step3_219.png VRD_231.png Rubik_example01_step4_398.png There are some algorithms if you cannot do it intuitively yet. Try turning the cube so the white is facing up again, and check to see which direction the corner points. If it faces right, you can do R’ D’ R. If it faces you, you can do D’ R’ D R. If it faces down, you can do F L D2 L’ F’. Another common method for solving a corner is to have it above the slot it needs to go in and repeat R U R’ U’ until it is solved. At the end of this step, the first layer should be complete, with a solid color (in this case, white) at the bottom.
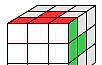
Verify your first layer is correct. You should now have the first layer complete and look like this (from the bottom side): Rubik_FLcomplete_1_571.png Rubik_FLcomplete_2_642.png Rubik_FLcomplete_3_348.png
Middle Layer
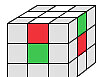
Place the four edges of the middle layer. Those edge pieces are the ones that do not contain yellow in our example. You need to know only one algorithm to solve the middle layer. The second algorithm is symmetrical to the first. If the edge piece is located in the last layer: Rubik_ML_1_995.png HUL_668.png VRU_128.png HUR_929.png VRD_231.png HUR_929.png FCCW_690.png HUL_668.png FCW_465.png (1.a) Rubik_ML_2_778.png HUR_929.png VLU_765.png HUL_668.png VLD_114.png HUL_668.png FCW_465.png HUR_929.png FCCW_690.png (1.b)symmetrical to (1.a) If the edge piece is in the middle layer but in the wrong place or with the wrong orientation, simply use the same algorithm to place any other edge piece in its position. Your edge piece will then be in the last layer, and you just have to use the algorithm again to position it properly in the middle layer.
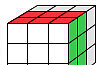
Verify correct positioning. Your cube should now have the first two layers complete and look like this (from the bottom side) : Rubik_F2Lcomplete_1_660.png Rubik_F2Lcomplete_2_149.png Rubik_F2Lcomplete_3_840.png
Last Layer
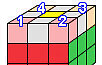
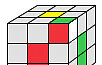
Permute the corners. At this step, our goal is to place the corners of the last layer in their correct position, regardless of their orientation. Locate two adjacent corners that share a color other than the color of the top layer (other than yellow in our case). Turn the top layer until these two corners are on the correct color side, facing you. For instance, if the two adjacent corners both contain red, turn the top layer until those two corners are on the red side of the cube. Note that on the other side, the two corners of the top layer will both contain the color of that side as well (orange in our example). Rubik_LL_Corners_Permute_316.png Determine whether the two corners of the front side are in their correct position, and swap them if needed. In our example, the right side is green, and the left side is blue. Therefore the front corner on the right must contain green, and the front corner on the left must contain blue. If it is not the case, you will need to swap those two corners with the following algorithm: Swap 1 and 2 : VLU_765.png HUR_929.png VLD_114.png FCW_465.png HUL_668.png FCCW_690.png VLU_765.png HUL_668.png VLD_114.png HUL_668.png HUL_668.png (2.a) Do the same with the two corners at the back. Turn the cube around to place the other side (orange) in front of you. Swap the two front corners if needed. As an alternative, if you notice that both the front pair and the back pair of corners need to be swapped, you can do it with only one algorithm (note the huge similarity with the previous algorithm): Swap 1 with 2 and 3 with 4 : VLU_765.png HUR_929.png VLD_114.png FCW_465.png HUL_668.png HUL_668.png FCCW_690.png VLU_765.png HUL_668.png VLD_114.png (2.b)

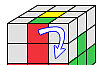
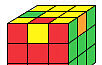
Orient the corners. Locate each top color facelet of the corners (yellow in our case). You need to know only one algorithm to orient the corners: Rubik_LL_Corners_Orient11_237.png Rubik_LL_Corners_Orient12_951.png VRU_128.png HUL_668.png VRD_231.png HUL_668.png VRU_128.png HUL_668.png HUL_668.png VRD_231.png HUL_668.png HUL_668.png (3.a) The algorithm will rotate three corners on themselves at once (from the side to the top). The blue arrows show which three corners you are turning, and in which direction (clockwise). If the yellow stickers are the way shown on the pictures and you perform the algorithm once, you should end up with the four yellow stickers on top : Rubik_LL_corners_complete_112.png Rubik_LL_corners_complete3D_156.png It is also convenient to use the symmetrical algorithm (here the red arrows are counter-clockwise turns): Rubik_LL_Corners_Orient21_209.png Rubik_LL_Corners_Orient22_925.png VLU_765.png HUR_929.png VLD_114.png HUR_929.png VLU_765.png HUR_929.png HUR_929.png VLD_114.png HUR_929.png HUR_929.png (3.b)Symmetrical to (3.a) Note: performing one of these algorithms twice is equivalent to performing the other. In some cases, you will need to perform the algorithm more than once : Two correctly oriented corners : Rubik_LL_CO_11_540.png = Rubik_LL_CO_12_123.png = Rubik_LL_CO_13_185.png + Rubik_LL_CO_14_139.png Rubik_LL_CO_21_332.png = Rubik_LL_CO_22_161.png = Rubik_LL_CO_23_935.png + Rubik_LL_CO_24_58.png Rubik_LL_CO_51_809.png = Rubik_LL_CO_52_345.png = Rubik_LL_CO_53_343.png + Rubik_LL_CO_54_269.png No correctly oriented corner : Rubik_LL_CO_31_931.png = Rubik_LL_CO_32_753.png = Rubik_LL_CO_33_614.png + Rubik_LL_CO_34_739.png Rubik_LL_CO_41_157.png = Rubik_LL_CO_42_249.png = Rubik_LL_CO_43_207.png + Rubik_LL_CO_44_611.png More generally, apply (3.a) in those cases: Two correctly oriented corners : Rubik_LL_OC_2c_116.png No correctly oriented corner : Rubik_LL_OC_0c_870.png
Permute the edges. You will need to know only one algorithm for this step. Check whether one or several edges are already in the proper position (the orientation does not matter at this point). If all the edges are in their correct positions, you are done for this step. If one edge only is correctly positioned, use the following algorithm : Rubik_LL_EP_11_863.png Rubik_LL_EP_12_216.png VMU_830.png HUR_929.png VMD_671.png HUR_929.png HUR_929.png VMU_830.png HUR_929.png VMD_671.png (4.a) Or its symmetrical : Rubik_LL_EP_21_608.png Rubik_LL_EP_22_334.png VMU_830.png HUL_668.png VMD_671.png HUL_668.png HUL_668.png VMU_830.png HUL_668.png VMD_671.png (4.b)Symmetrical to (4.a) Note : performing twice one of these algorithms is equivalent to performing the other. If all four edges are incorrectly positioned, perform one of the two algorithms once from any side. You will then have only one edge correctly positioned.
Orient the edges. You will need to know two algorithms for that last step : Rubik_LL_EO_11_599.png Rubik_LL_EO_12_218.png Dedmore "H" Pattern VRD_231.png HML_291.png VRU_128.png VRU_128.png HMR_429.png HMR_429.png VRD_231.png HUL_668.png HUL_668.png VRU_128.png HMR_429.png HMR_429.png VRD_231.png VRD_231.png HMR_429.png VRU_128.png HUL_668.png HUL_668.png (5) Rubik_LL_EO_21_958.png Rubik_LL_EO_22_808.png Dedmore "Fish" Pattern FCW_465.png HML_291.png VRU_128.png VRU_128.png HMR_429.png HMR_429.png VRD_231.png HUL_668.png HUL_668.png VRU_128.png HMR_429.png HMR_429.png VRD_231.png VRD_231.png HMR_429.png VRU_128.png HUL_668.png HUL_668.png VRD_231.png FCCW_690.png (6) Note the DOWN, LEFT, UP, RIGHT, sequence to most of the Dedmore "H" and "Fish" algorithms. You really have only one algorithm to remember since : (6) = FCW_465.png VRU_128.png + (5) + VRD_231.png FCCW_690.png If all four edges are flipped, perform the "H" pattern algorithm from any side, and you will have to perform that algorithm one more time to solve the cube.
Congratulations! Your cube should now be solved.
Notations
This is the key to the notations used. The pieces that compose the Rubik's Cube are called Cubies, and the color stickers on the cubes are called facelets. There are three types of Cubies: The centers (or center pieces), at the center of each face of the Cube. There are six of them, each have one facelet, they always stay in the same place relative to each other. The corners (or corner pieces), at the corners of the Cube. There are eight of them, and each have three facelets The edges (or edge pieces), between each pair of adjacent corners. There are 12 of them and each have 2 facelets Not all cubes have the same color schemes. The colors used for these illustrations is called BOY (because the Blue, Orange and Yellow faces are in clockwise order). Examine the positions of the centers relative to each other, as this is always your color scheme. White opposes yellow; Blue opposes green; Orange opposes red; Orange is to the right of blue if white is facing up.

This article uses two different views for the Cube: The 3D View, showing three sides of the Cube: the front (red), the top (yellow), and the right side (green). In Step 4, the algorithm (1.b) is illustrated with a picture showing the left side of the cube (blue), the front (red) and top (yellow).3D View The Top View, showing only the top of the cube (yellow). The front side is at the bottom (red). Top View

For the top view, each bar indicates the location of the important facelet. In the picture, the yellow facelets of the top back corners are on the top (yellow) side, while the yellow facelets of the top front corners are both located on the front side of the cube. Showing Yellow Facelets
When a facelet is grey, it means that its color is not important at the moment.

The arrows (blue or red) show what the algorithm will do. In the case of the algorithm (3.a) for instance, it will rotate the three corners on themselves as shown. If the yellow facelets are as drawn on the picture, at the end of the algorithm they will be on top.algorithm (3.a) The axis of the rotation is the big diagonal of the cube (from one corner to the corner all the way on the other side of the cube). Blue arrows are used for clockwise turns (algorithm (3.a)). Red arrows are used for counter-clockwise turns (algorithm (3.b), symmetrical to (3.a)).

For the top view, the light blue facelets indicate that an edge is incorrectly oriented. In the picture, the edges on the left and right are both incorrectly oriented. This means that if the top face is yellow, the yellow facelets for those two edges are not on the top, but on the side. Showing Incorrectly Oriented Edges

For the move notations it is important to always look at the cube from the front side. Rotation of the front side. FCW_465.png FCCW_690.png Rotation of one of the three vertical rows: VLU_765.png VLD_114.png VMU_830.png VMD_671.png VRU_128.png VRD_231.png Rotation of one of the three horizontal rows: HUR_929.png HUL_668.png HMR_429.png HML_291.png HDR_354.png HDL_108.png A few examples of moves: START FCW_465.png VMU_830.png VRD_231.png HUR_929.png Rubik_Initial_537.png Rubik_after_FCW_53.png Rubik_after_VMU_719.png Rubik_after_VRD_341.png Rubik_after_HUR_368.png


Comments
0 comment